


-
Building a simple app with React and Redux
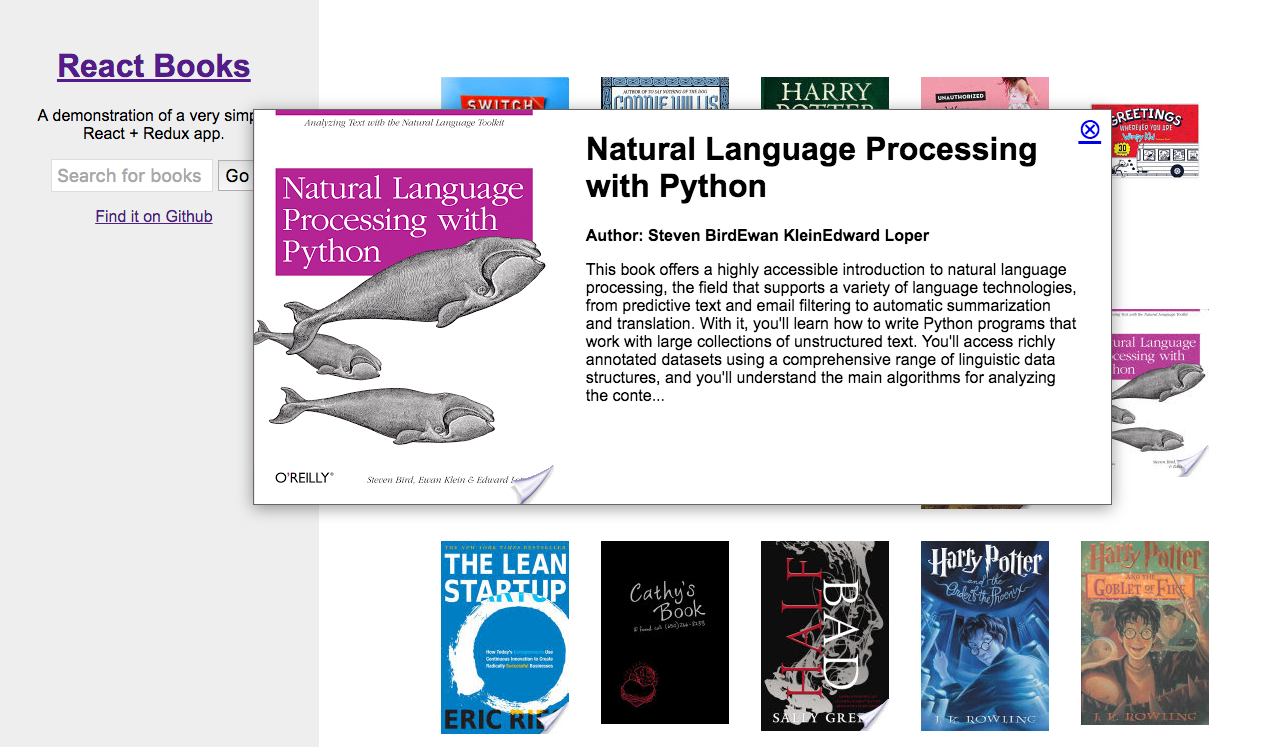
I built a simple React + Redux app as a demonstration to help my company transition from using Marionette + Backbone to React + Redux. It simply fetches metadata from the Google Books API and lets you search it. It is on Github here Github and it can be demo’d here Demo.
Whats different about React
You update the UI by updating the state
Using jQuery you might write some code like this to show or hide an element.
  $('.element').on('click', function (event) {
    event.preventDefault();
    var $dropdown = $(this).closest('.my-dropdown');

    if ($dropdown.is(':visible')) {
      $dropdown.hide();
    }
    else {
      $dropdown.show();
    }
  });
In React the parts of your interface are broken up into components. A component returns the html it should show based on it’s state.
Simply changing the state of a component will cause it to re-render and show the new state, completely handled by React, with no action on your part.
So the above familiar bit of jQuery might look like this in React.
  import React, { Component } from 'react';

  export default class MyDropDown extends Component {
    constructor () {
      super();

      this.state = {
        'is_hidden': true
      }

      this.showDropdown = this.showDropdown.bind(this);
      this.hideDropdown = this.hideDropdown.bind(this);
    }

    showDropdown (event) {
      this.setState({ 'is_hidden': false });
    }

    hideDropdown (event) {
      this.setState({ 'is_hidden': true });
    }

    render () {
      return (
        <div>
          {!this.state.is_hidden &&
          <div className="my-dropdown">
            <div>Dropdown text</div>
            <a href="#"
              onClick={this.hideDropdown}>
            Hide Dropdown
            </a>
          </div>}
          {this.state.is_hidden &&
          <a href="#"
            onClick={this.showDropdown}>
          Show Dropdown
          </a>}
        </div>
      )
    }
  }
The above React component returns
jsx. This is a javaScript syntax that can contain html and also React components. I recommend this resource for more information onjsx.Props vrs state
React divides data between
stateandprops. Props are immutable data that get passed from parent through child components.stateis mutable and handled within components where it can only be modified there.Data in the above dropdown example is
statebecause it is mutable and is local to the component.The difference between
stateandpropsbecomes more obvious when you want to display a list of components. Ifpropswas passed into a list of components, a single change topropswill effect every component.Example passing
booksprops into thePaginationcomponent.<Pagination books={books} />Example of a single book component rendering book props data
  render () {
    const { volumeInfo } = this.props.book;

    return (
      <li className="book-item">
        <a href="#"
          onClick={this.showDetail}
        >
          <div className="wrap-book">
            {volumeInfo.imageLinks &&
            <img key={volumeInfo.imageLinks.thumbnail}
              src={volumeInfo.imageLinks.thumbnail} />}
          </div>
        </a>
      </li>
    )
  }
Meanwhile, you may want to just make a change to a single component out of that list, in that case you’ll need to change the
statefor that one component.Pass callbacks into child components
A logical next question is how do I make a change to a child component based on the behavior of it’s parent?
Parent components can handle changes from child components by passing them callbacks.
Example passing a function from a parent component to a child component. The child component will refer to the callback function as
this.props.handleClick.<MyChildComponent handleClick={this.onChildClick} />A good pattern to create very reusable components is to have several
statelesschild components that are handled by verystatefulparent components. The stateless components simply handle rendering while the stateful components take care of interaction logic.Routing
Routes handle url changes in a react app. It is best to always handle change to pages of content through the router. It will reduce logic in your app because you can grab parameters in the url from the router to reason about what content to display. It is also best practice to maintain a browser history and not break the browsers back button (which is a bad thing to do).
This app uses
react-routeravailable through npm. There are only two routes to keep things very simple.<Router history={browserHistory}> <Route path="/" component={AppContainer} > <Route path="page/:page/:query/:index" component={AppContainer} /> </Route> </Router>The route maps the url path
/to theAppContainercomponent. Browsing to the index page will invoke theAppContainercomponent and pass in a few router props likerouteandrouteParamswhich will contain url segments.<Route path="page/:page/:query/:index" component={AppContainer} />The above nested route also goes to
AppContainer. This route requires a url that may look something like/page/1/sci-fi-books/11/. Everything after/page/are routeParams and will show up aspropsinAppContainer. These parameters are passed through the router because they are needed to create the correct data required to search against the Google Books API.Components
Components in this app are divided between
containercomponents and the rest of them. Container components are smart, they listen to the Redux store via redux connect and handle a lot of state which they pass down aspropsto their child components. They are also often directly hooked up to routes, as the AppContainer is in this case.The rest of the components try to be as dumb as possible, that is they should ideally not handle any state. This way they will be more reusable.
Component lifecycle
Components have functions that React will call at specific times during it’s lifecycle.
componentWillMount()is a lifecycle method that is called immediately before rendering occurs. This is a good point to dispatch events so that the component can render data returned from a network request for instance. This method is only invoked once, so you can’t rely it when the component renders again. Think of it like when you initially visit a webpage, it’s called once right before the webpage is shown but never again.If you want to update a component on renders after the initial one happens,
componentWillReceiveProps()is a good one to use. It is not invoked the first time before a page render whencomponentWillMount()is invoked, but everytime after when the component receives new props this method is called right before rendering. It also receives the new props as it’s argument, so it is good to use to compare new props with the old props.Actions
In a Redux app, the best way to change state is through dispatching an action. Let’s look at the first action we dispatch in the
AppContainer.componentWillMount () { const { index, query } = this.props.params; let searchInfo = { 'query': query || c.DEFAULT_SEARCH, 'index': index || c.SEARCH_START_INDEX, 'maxResults': c.RESULTS_PER_PAGE }; store.dispatch(getBooks(searchInfo)); }The
storein redux holds application state. It allows you to dispatch actions usingdispatch(action), access state usinggetState(), subscribe to changes usingsubscribe(listener).store.dispatch(getBooks(searchInfo));dispatches an action to getBooks. This is an API action in thesrc/modules/books/api.jsfile.export function getBooks(searchInfo) { const { query, maxResults, index } = searchInfo; return function (dispatch) { dispatch(getBooksRequest()); return axios.get(`${c.GOOGLE_BOOKS_ENDPOINT}?q=${encodeURIComponent(query)}&startIndex=${index}&maxResults=${maxResults}&projection=full&fields=totalItems,items(id,volumeInfo)`) .then(response => dispatch(getBooksSuccess(response, searchInfo)) ); } }This action makes an ajax request to the Google books API. If the request is successful and resolves, a new action
dispatch(getBooksSuccess(response, searchInfo)is emitted.The
getBooksSuccessaction from thesrc/modules/books/actions.jsfileexport function getBooksSuccess(response, searchInfo) { return { type: types.GET_BOOKS_SUCCESS, books: response.data, searchInfo: searchInfo }; }This action passes the response data from the Google Books API request to a reducer where it can be stored in our application state.
The reducer from the
src/modules/books/reducer.jsfileimport * as types from './actionTypes'; import React from 'react'; const initialState = { books: { 'items': [] } }; export default (state = initialState, action) => { switch(action.type) { case types.GET_BOOKS_REQUEST: return Object.assign({}, state, { isFetching: true, didInvalidate: false }); case types.GET_BOOKS_SUCCESS: return Object.assign({}, state, { isFetching: false, didInvalidate: false, books: { items: action.books.items, totalItems: action.books.totalItems, info: action.searchInfo } }); } return state; }The switch case
types.GET_BOOKS_SUCCESSpicks up thegetBooksSuccessaction and stores some data. This includes a valueisFetching. This value istruein the above switch case for theGET_BOOKS_REQUESTaction. This is a useful boolean flag for showing a spinner of some sort in your UI while network requests take place.Another value,
didInvalidateis useful for telling our application state it is holding outdated data and needs to fetch new data.We also of course store the books response in the
booksobject.Updating the UI after storing data
AppContainercan listen for any updates to this data and automatically respond with appropriate React lifecycle methods. This is done via Redux Connect.AppContainerlooks like this hooked up to Redux Connect.import React, { Component, PropTypes } from 'react'; import { connect } from 'react-redux'; import store from 'store'; import Books from 'components/Books'; import Header from 'components/Header'; class AppContainer extends Component { render () { const { booksState } = this.props; const { books } = booksState; return ( <div className="app-wrapper"> <Header /> <div className="books-layout"> <Books books={books.items} />} </div> </div> ) } } AppContainer.propTypes = { booksState: PropTypes.object.isRequired } const mapStateToProps = function (store) { return { booksState: store.booksState } } export default connect(mapStateToProps)(AppContainer);There is more going on in the actual component but this is all you would need to hook up to the Redux store. The beauty of this is now all you need to do is dispatch actions that change the data stored in Redux and AppContainer will automatically receive and respond to the new data.
Origin of
booksStateIt is not immediately obvious where
booksStatecomes intoAppContainerthrough the reducer. ThebooksStateobject comes from the Redux reducers in thestore.jsfile.import { createStore, applyMiddleware } from 'redux'; import reducers from './reducers'; import thunkMiddleware from 'redux-thunk'; import createLogger from 'redux-logger'; const loggerMiddleware = createLogger() const store = createStore( reducers, applyMiddleware( thunkMiddleware ) );This file combines all of the reducers into one object and is responsible for directly exporting the
booksStateobject. store.js also hooks up some Redux middleware, including thethunkMiddlewarewhich allows for the more complex actions I use in theapi.jsfiles.Taking a look at the
reducers.jsfile,import { combineReducers } from 'redux'; import * as books from 'modules/books'; import * as bookDetail from 'modules/book-detail'; // Combine Reducers var reducers = combineReducers({ booksState: books.reducer, bookDetailState: bookDetail.reducer }); export default reducers;You can see that the books reducer is responsible for the
booksState.Modules
I broke up the organization of this app into “modules”, the parts of the application which deal with state. They are self-contained units which should expose public functions in index.js for other parts of the application.
A module will usually contain these files.
actionTypes.js and actions.js
The only way to mutate state in a react app is to emit an action. An action is a plain javaScript object which describes what happened. ActionTypes are kinds of actions.
reducer.js
Reducers maintain a state tree in redux. Reducers are pure functions which do not mutate / change state but rather create a copy of a new state.
api.js
Functions that facilitate network requests should go in the API file. These functions use Redux Thunk Async Actions to perform requests, dispatch the state of the request then store the response.
index.js
Modules should expose functions via this file. You should not directly import functions in modules from other parts of the application to use. This is best practice to avoid recursive imports and keep code decoupled.
For example, this is wrong;
import getBooks from 'modules/books/api';This is right;
  import * as books from 'modules/books';
  const { getBooks } = books.api;
If another part of the application needs to dip into a module to manipulate some things, the module should instead expose a function via index.js that does the manipulations that other parts of the app can run instead.
Tests
For testing components I used enzyme. It allows you to test React components without fully rendering them using a
shallowmethod. This way you can test components without including the dependencies you would need if you were to render them in the DOM.Testing a component using enzymes
shallowmethod, from thetests/components/Book.tests.jsfileimport expect from 'expect'; import React from 'react'; import axios from 'axios'; import MockAdapter from 'axios-mock-adapter'; import store from 'store'; import * as c from 'constants'; import booksJSON from 'fixtures/books.json'; import Book from 'components/Book'; const { shallow, mount } = enzyme; const singleBook = booksJSON.items[0]; function setup(properties = {}) { const props = Object.assign({ book: singleBook }, properties); const enzymeWrapper = shallow( <Book {...props} /> ) return { props, enzymeWrapper } } describe('<Book />', () => { it('should render self and subcomponents', () => { const { enzymeWrapper } = setup(); expect(enzymeWrapper.find('.book-item').length).toExist(); }); it('clicking book should make request to get book details.', () => { const { enzymeWrapper } = setup(); const mock = new MockAdapter(axios); mock.onPost(`${c.GOOGLE_BOOKS_ENDPOINT}/${singleBook.id}`) .reply(200, { response: { data: singleBook } }); enzymeWrapper.find('a').simulate('click', { preventDefault() {} }); expect(store.getState().bookDetailState.isFetching).toExist(); mock.reset(); }); });You can also use
mountto render components. This is often necessary for simulating click events which occur in the DOM.Testing a component using enzymes
mountmethod, from thetests/components/BookDetail.tests.jsfileimport expect from 'expect'; import React from 'react'; import store from 'store'; import booksJSON from 'fixtures/books.json'; import BookDetail from 'components/BookDetail'; const { mount } = enzyme; const singleBook = booksJSON.items[0].volumeInfo; function setup(properties = {}) { const props = Object.assign({ book: singleBook }, properties); const enzymeWrapper = mount( <BookDetail {...props} /> ) return { props, enzymeWrapper } } describe('<BookDetail />', () => { it('should render self and subcomponents', () => { const { enzymeWrapper } = setup(); expect(enzymeWrapper.find('.detail-view').length).toExist(); }); it('clicking close detail link should empty the book details state.', () => { const { enzymeWrapper } = setup(); enzymeWrapper.find('a').simulate('click'); expect(Object.keys(store.getState().bookDetailState.book).length).toNotExist(); }); });Wrapping up
I covered a lot of material very quickly in this blog post. I highly recommend these sources for digging further into the details.
-
Testing javaScript with jsdom and Django in jenkins
Jsdom is an implementation of the DOM in javaScript. Here is how to set it up using python and Django for generating html fixtures, mocha for javaScript testing and sinonjs for stubs and mocks.
Install the packages from npm.
npm install --save mocha jsdom sinonSetting up jsdom
I created a file called
browser.jsthat sets up jsdom and stubs out a few functions that are global in a real browser. This includes some ‘taming’ of sinons server mock which did not work for me right out of the box.global.jsdom = require('jsdom'); global.document = jsdom.jsdom( '<!DOCTYPE html data-debug=1>' + '<head></head>' + '<body>' + '<div id="mocha-fixture"></div>' + '</body>' + '</html>' ); global.document.activeElement = document.body global.window = document.defaultView; global.XMLHttpRequest = global.window.XMLHttpRequest; global.navigator = window.navigator; global.sinon = require('sinon'); global.sinon.useFakeXMLHttpRequest(); global.window.XMLHttpRequest = global.XMLHttpRequest;Running the tests
You can run single test suites this way by just requiring this file when you run the mocha command, for example;
mocha static/test/build/testUpdateBillingInfo.js --require 'static/test/mocha/browser.js'You can create another file to run all of the tests at once. This file will just import all of your mocha test modules. For example, I created a file called
run.js. At the top of this file I imported thebrowser.jsfile which any mocha module is dependent on in this setup. Then I simply run the file in mocha.mocha static/test/mocha/run.jsGenerating html fixtures
Some of my javaScript uses html on the page, for example validating fields in a form. For me, these were in Django templates. I decided I would dynamically generate these templates using a Django management command. I could run this command before I run the mocha tests in jenkins. This way the tests will fail if anyone modifies the templates in such a way as to break the javaScript.
  import os

  from django.conf import settings
  from django.template.loader import render_to_string

  from django.http import HttpRequest

  from django.utils.encoding import smart_str, smart_unicode
  from django.template import RequestContext
  from django.test import RequestFactory

  class MochaTestCase(object):
      def build_fixture_html(self, file_name, content):
          file_path = 'static/test/mocha/fixture/%s' % (file_name)
          directory = 'static/test/mocha/fixture'

          if not os.path.exists(directory):
              os.makedirs(directory)

          if not os.path.isfile(file_path):
              open(file_path, 'w')

          with open(file_path, 'w') as file:
              file.write(smart_str(content))

      def to_string(self, template, context):
          request_factory = RequestFactory()
          request = request_factory.get('/')
          return render_to_string(template, context, RequestContext(request))

      def get_content(self):
          return self.content

      def render(self):
          self.build_fixture_html(self.__class__.fixture, self.get_content())
This is my base python class for creating a blank file, outputting a Django template into a string and then writing it into this blank file.
I pass my Django template to this base class to write these files.
  from forms import FeedbackForm

  class FeedbackFormTestCase(MochaTestCase):
      fixture = 'feedback_form.html'

      def __init__(self):
          self.content = self.to_string('includes/feedback_form.html', {
              'feedback_form': FeedbackForm()
          })
Another function in this same python file creates the class and actually calls the function to write the file.
  def buildFixtures():
      feedbackForm = FeedbackFormTestCase()
      feedbackForm.render()
Running a Django management command
In order to generate these fixtures everytime I need them, I need to run a Django management command.
  from django.core.management.base import BaseCommand
  from tests.mocha.js_fixtures import buildFixtures

  class Command(BaseCommand):
      help = 'Generate fixtures from Django for mocha javaScript tests.'

      def handle(self, *args, **options):
          buildFixtures()
I called this file
generate_mocha_fixtures.py. Now I can build all my mocha fixtures by running this Django management command,./manage.py generate_mocha_fixtures.Including fixtures in tests
Now that Django can generate my test fixture files, I can simply include these files in my tests using a javaScript template engine like lodash. For example, the setup and teardown of my mocha tests may include the following.
  import feedbackFormTpl from './fixture/feedback_form.html';

  describe('Test feedback form', function () {
    beforeEach(() => {
      $('#mocha-fixture').html(feedbackFormTpl());
    });

    afterEach(() => {
      $('#mocha-fixture').html('');
    });
Debugging
You can include a
debugoption when running mocha and the tests will stop at every point in your javaScript where you includedebugger;statements. Simply run;mocha debug static/test/mocha/run.jsDebugging in node is a bit different then in the browser. Maybe you have written a bit of python before and are familiar with pdb. It is a little bit like that.
There is some great documentation on the matter here.
To get started, run the debugger command with some
debugger;breakpoints in your code. Typecontto go to the next breakpoint or typerepl, then type some variables, their values should be directly outputted back to you.Using scripts
I like to add my mocha commands as scripts so that they are easy to remember. In my
package.jsonfile they look like this,"scripts": { "test": "mocha static/test/mocha/run.js --timeout 5000", "test:debug": "mocha debug static/test/mocha/run.js", },Now I can simply run
npm run testto run all of my mocha tests. The timeout option just raises the limit of time a test has to finish before mocha shuts it down and fails with a ‘timeout error’.Adding to jenkins
In jenkins, add a new build and call it something like “mocha-tests”. Within the
buildsection, add a build step to execute shell. Here you should add the script commands jenkins will need to run the tests.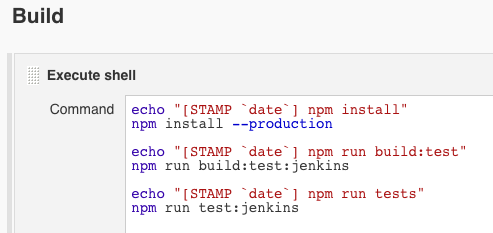
The first command will install all the node_modules in
package.jsonusing the--productionflag to indicate that scripts listed underdevDependenciesinpackage.jsonshould not be installed. I’ve added two new script command to mypackage.json."scripts": { "build:test:jenkins": "./manage.py generate_mocha_fixtures --settings=settings.mocha && webpack --config webpack.config.test.js --progress --colors", "test:jenkins": "mocha --recursive -R xunit static/test/mocha/run.js > test-reports.xml --timeout 30000" },Running
npm run build:test:jenkinswill run my Django management command and generate my html fixtures from Django templates. Following that, I will compile my test files from webpack (this may be an unnecessary step for you).Running
npm run test:jenkinswill write the mocha test results to atest-reports.xmlfile in jenkins. Jenkins will use this to properly inform you of failed tests.Below the build section is a
Post-build Actions. I add an action to publish a JUnit test result report. In the test report XMLs, addtest-reports.xml.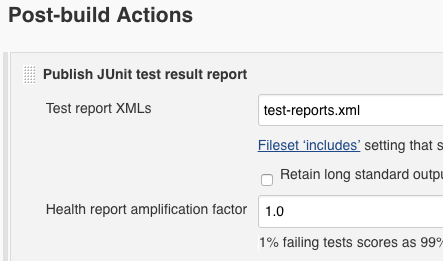
Finishing up
So is it worth using jsdom for javaScript testing? Among the pros are that it is quite fast. It is easy to run hundreds of tests very often. Also, debugging in node is a nice change of pace from working in the browser.
However, it is worth remembering that jsdom is not a real browser. If your tests rely too much on the DOM, you may be opening yourself up to bugs you can’t catch. For me, this is a good challenge to do much less DOM manipulation.
-
React.js, performance and web security at Fluent 2015
Fluent 2015 was packed with presentations on javaScript, microservices, native script, GIT, design and much more. It was fascinating diving into languages and topics presented by people who are leaders on them. Here are a few things that I took away from it that will effect the way I work.
React.js
React.js is pretty hot right now. I got a nice introduction and high level overview and in the process became more aware of the limitations of backbone.js (the front-end framework we use at Safari). React does away with the “model, view, controller” or MVC idea and instead consolidates its components into the “view” layer while focusing on doing it really well. React offers a few advantages over MVC frameworks, including;
1. Stateless over stateful
Backbone can manage data state quite well. Fetching data from a server, storing it in models and collections and displaying it in views. As your Backbone application grows and becomes more interactive you start to lean more on ‘application state’, the kind of state which manages your data. Your views need to talk to each other more consistently and it starts to get trickier to keep track of the messages flowing through your global event bus (thankfully there are libraries like Marionette.js and Backbone Radio to help with this).
React takes a different approach and divides data acces into ‘state’ and ‘props’. Props are immutable ‘things’ that get passed from parent through child nodes. React advocates using these as much as possible. ‘State’ is mutable and kept within components where it can only be modified there. React advocates using this as little as possible.
In a react application, lines of communication build up in a tree-node structure. Data flow is one-way from parent down through child nodes. Child nodes can display data but not modify it, they can handle events and will send callbacks up to parents to modify their logic. In this way, data flow is similar to the original data flow blueprint that Events (bubbling up and down) and Cascading Style Sheets already use, the DOM.
2. Precise re-rendering through a virtual DOM
React uses a ‘virtual DOM’ for efficient re-rendering of the DOM. The virtual DOM uses a diff algorithm to generate a real DOM patch and avoid unnecessary re-renders. Virtual DOM diffs are more similar to Github code diffs so that DOM updates are very precise. This is in contrast to other frameworks, (like Backbone) that will do large re-renders, even multiple times, that are often largely unnecessary.
3. JavaScript and HTML mushed together
React has a component called ‘JSX’ that allows you to write HTML inside its javaScript. I was a little uncomfortable about this but I’ve opened up to it. React wants you to think of things in terms of components made up of behaviors and layouts that often model your markup. It makes a convincing argument that MVC is great on the server, but not so much on the client. I’m willing to give it a go.
4. Clarity over brevity
React wants you to name your handlers and variables in a way that you can immediately identify how they work later. I think all javaScript frameworks can take away something from this. Type a few extra characters into your handler names, you will thank yourself later when you come back to refactor it.
Performance
It is not news that performance is good and can help you increase revenue. Google is even now ranking websites higher that load quickly on mobile devices. This means building your site responsive and fast in all devices is more important then ever. So how can we accomplish this?
Prototype early
Get your designers and developers together early. Establish communication early and ask the question, “what are the most important things?”.
Measure performance from the start
Users expect your site to load fast. You can prioritize performance by setting a ‘performance budget’. Plug your site into www.webpagetest.org and look at the ‘start render’ and ‘speed index’.
The ‘start render’ is the measurement between when the user was staring at a blank screen and the very first thing displayed on the screen.
The ‘speed index’ is the average time visible parts of the site are rendered. It computes an overall score for how quickly content is painted by looking at the visual progress, captured in frames and measured in percentages. More info on speed index here.
Do some benchmarking by doing the same for a few competitor sites. Set a performance mark such as 20% faster then competitor B. Set limits on load time, render time, css and js payload sizes.
Custom metrics
The metrics on webpagetest.org aren’t the only way to judge performance. You can identify your own custom metrics by prioritizing the most important things on the page. Twitter defined theirs as the ‘time to first tweet’, how long it takes for a user to see the first tweet at the top of their timeline.
Other tools to use include the User Timing Spec, Google Anaytlics and Speed Curve.
Web Security
Security is more important then ever. I learned a few things from the web security presentation.
On login and authentication, you should check for these things and make sure they don’t happen;
- Is password echoed to the screen ? (looking over someones shoulder hack)
- Is login form served without HTTPS ?
- Are login username and password sent without HTTPS ?
- Are authenticated cookies transmitted without HTTPS ?
- Session cookies should be ‘secure’ and ‘HttpOnly’
- Check your authentication cookie flags. Look for the ‘session cookie’ in the browser console tab, (under resources in Chrome) and make sure it’s ‘Secure’ and ‘HttpOnly’ flags are set.
The ‘HttpOnly’ flag means the cookie cannot be accessed through a client side script. So if a bug such as an XSS flaw exists and a malicious script were to access it, the browser would not reveal the cookie.
The ‘secure’ flag will make sure your cookie is encryped and prevent them being read by unauthorized sources. This flag requires HTTPS, browsers won’t send the cookie with the secure flag over unencrypted HTTP.
These are both good things to look for because exposing your session to someone would be the same as logging in to your site and then walking away, allowing anyone to do what they want with the same priveleges as a logged-in user.
Invalidation of cookies at logout
Your cookies should be invalidated after logout. You can check this by logging in, find your session cookie, api_key or other cookie values relevant to your current session and copy / paste them somewhere. Log out, log back in and change those new values back to what they were.
You can replace the cookie values using javaScript in the browser console. You shouldn’t be able to continue using the site after that point. This would mean if someones session was compromised it could be for an indefinite period of time.
There are some great tools out there for checking your session hijacking security, including;
- Cookie cadger
- Qualys SSl Checker2
- Google Safer Email Report
- Asafaweb.com
_
Fluent 2015 was a whirlwind of information. I learned about the Hack programming language Facebook uses from it’s creator Julien Verlaguet. I dove into native script with Googles Brad Nelson. There was even a javaScript musical.
There was probably only less then 1% of the community there, but I really got a sense of just how large and vibrant the javaScript and larger web community is. It feels good to be a javaScript developer in 2015.
-
Mixing Backbone Events
Backbone allows you to mix your own custom events to bind and trigger.
Example in a require module.
  define(function (require) {
    var Backbone = require('backbone'),
      _ = require('underscore'),
      proxy = {};

     _.extend(proxy, Backbone.Events);

    return proxy;
  });
Somewhere else you can include this and start creating your own triggers.
  define(function (require) {
    var Backbone = require('backbone'),
      proxy = require('js/proxy');

      myfunction = function (msg) {
         console.log(msg);
      };

     proxy.on('myevent', myfunction);
     ...
     proxy.trigger('myevent', 'Lets do some nice stuff');
  });
When myevent is triggered it will pass in ‘Lets do some nice stuff’ to myfunction and output it to the console.
Backbone allows you to pass single and multiple events.
  proxy.on('my_first_event', myfunction);
  proxy.on('my_second_event', myfunction);
  proxy.on('my_third_event', myfunction);
Trigger a single event.
proxy.trigger('my_second_event', 'Say some nice stuff');Trigger multiple events.
proxy.trigger('my_first_event my_second_event my_third_event', 'say this three different times');You can pass multiple arguments to a single event.
  myfunction = function (do, stuff) {
      console.log('I want to ' + do + ' some ' + stuff);
  };

  proxy.trigger('my_first_event', 'eat', 'candy');
You can pass multiple arguments to multiple events.
proxy.trigger('my_first_event my_second_event', 'chow', 'food');There is a catchall where you can listen to all events.
  proxy.on("all", function(event) {
      console.log("The event was " + event);
   });
You can also turn off events.
proxy.off("my_first_event");Delegate events
Backbone Views allow you to bind events easily,
  events: {
    'click #clickelement': 'clickedFunction'
  },
Behind the scenes is delegateEvents. So maybe you wanted to make two different types of events, you could do so like this;
var View = Backbone.View.extend({ el: '#somehtml', clickEvents: { 'click #clickelement': 'clickedFunction' }, keyEvents: { 'keyup #keyelement': 'keyedFunction' }, initialize: { var navEvents = _.extend(this.clickEvents, this.keyEvents); this.delegateEvents(navEvents); } }); -
Leveling up with backbone.js
(This post originally appeared on blog.safaribooksonline.com).
At Safari, we like Backbone.js for designing our front-end interactions, including our reading interface. I’m going to shed light on the concepts that I feel are crucial to working with Backbone, if you’re a beginner to it or similar MVC JS frameworks. If you already know a lot of Backbone, this post probably isn’t for you.
Models
Models are the heart of a Backbone project. They are a good place to start when beginning a project.
A model will contain the core data of an application and is often a representationa of a backend database model.
If you have ever written any JavaScript for an API without using an “MVC framework” you may be familiar with writing ajax functions and deferred callbacks. Backbone Models abstract this process and allow you to interact with your server much more simply.
  Cat = Backbone.Model.extend({
     defaults: {
        name: "Zeus",
        age: 3,
        color: "grey"
    },
    // called immediately when new Cat instance is created
    initialize: function () {
        this.on("change", function () {
              console.log(this.get("name"));
        });
    },
    url: "/update/api/"
  });

  var cat1 = new Cat();
Get() and set()
You can use
Model.set()andModel.get()to update and get model attributes before you send them to your server. Model.set() will set a hash change on the model and fire a change event; we’ve set a listener for that event in the initialize function.// change the model name to ‘Xena’ and logs Xena from change listener cat1.set({name: "Xena"});Model.get()allows quick access to model attributes.console.log(cat1.get("name")); // XenaUse JSON.stringify to read all the attributes of a model.
  console.log(JSON.stringify(cat1));
  // logs { name: "Xena", age: 3, color: "grey" }
Save()
Sending your model to your server is done with
Model.save(). This will delegate Backbone.sync and perform ajax using the URL we specified in the model.cat1.save({age: 5}); // sends a POST request to "/update/api/"" with the data // { name: "Xena", age: 5, color: "grey" }The attributes parameter is a hash value of the model attributes you want to send. Save options can include {patch:true} to send an HTTP PATCH request; this will modify only the attributes you’re passing in.
Calling
save()will immediately trigger a change event and update the model attributes. To avoid this, pass {wait: true} into options to wait for the server before setting the new attributes on your model. You can also pass into the options success and error handlers, or include them in your save function.save: function (attrs, options) { options.success = function (response, status, xhr) { // successful things here }; options.error = function (error) { // bad things here }; };Model.validate()is called beforeModel.save()and allows you to prevent updates if your data is invalid.Any error that is returned in
validate()will cause the save to abort. For example, adding this function to our Cat Model will fail because it fails to pass validation:// passes save hash attributes and options validate: function (attrs, options) { if (attrs.name !== "Zeus") { return "my cat is a God"; } }; cat1.save({name: "Xena"}); // fails because name isn’t ZeusOverride Backbone.sync
Sometimes you may want to customize how you update your API. You can override Backbone.sync globally (
Backbone.sync = function(method, model) …) or simply attach async()function to your model.// @param method is create, update, patch, delete or read // @param model is the Backbone model object // @param options may include success or error methods sync: function (method, model, options) { if (method === "create") { localStorage.setItem(model.id, JSON.stringify(model)); } }It’s helpful to understand how Backbone.sync maps its method handlers:
  var methods = {
    "create": "POST",
    "update": "PUT",
    "patch": "PATCH",
    "delete": "DELETE",
    "read": "GET"
  };
Now on
save()POSTs, you will simply store your model in localStorage.Events
Sometimes you need to run some code when something in particular happens elsewhere deep inside your code.
Backbone has a great publish/subscribe concept in its Events system. You can map any custom events to your handlers (Backbone recommends namespacing them) and trigger them multiple times, anywhere, by extending Backbone.Events:
  var myObject = {};
  _.extend(myObject, Backbone.Events);

  myObject.on("cat:sneeze", sneezing);
  myObject.on("cat:purr", purring);

  function sneezing (msg) { console.log("My cat " + msg); }
  function purring (msg) { console.log("My cat is " + msg); }

  // elsewhere in you’re code …
  myObject.trigger("cat:sneeze", "sneezed"); // function sneezing() logs “My cat sneezed”
  myObject.trigger("cat:purr", "purring"); // function purring() logs “My cat is purring”

  // remove all cat:sneeze events
  myObject.off("cat:sneeze");

  // remove just the specific listener
  myObject.off("cat:sneeze", sneezing);
On perhaps a simpler note, Backbone.Events is available globally in the Backbone object. So you can just as easily do,
  Backbone.on("cat:sneeze", function (msg) {
   console.log("My cat " + msg);
  });

  Backbone.trigger("cat:sneeze", "sneezed");
Views
Backbone.Views should handle the layer of logic between your models and the UI. Updates can happen automatically when your model changes. You can easily render JavaScript logic in HTML templates and trigger jQuery events and methods for DOM manipulation in much simpler terms.
  var Dog = Backbone.View.extend({
   el: "#dog-bone",

   template: _.template("A template"),

   events: {
     "click .my-button": "onClickHandler"
   },

   initialize: {
     this.$my_dog_bone = this.$el.find("#my-dog-bone");
     this.model.bind("change", _.bind(this.render, this));
   },

   render: function () {
     this.$el.html(this.template(this.model.toJSON()));
   },

   onClickHandler: function (event) {
     event.preventDefault();
     console.log(this.model.attributes);
   }

  });

 var dog1 = new Dog({ model: cat1 });
The view attaches to #dog-bone in the HTML and creates a reference in the view with this.$el. From there it is often a good idea to ‘cache’ all the jQuery references in variables for later use:
this.$my_dog_bone = this.$el.find("#my-dog-bone");By storing
$my_done_boneas a variable, I no longer have to traverse the DOM every time I want to do something with $(‘#my-dog-bone’).View#events: {}allows us to map jQuery-like events to our handlers. In this case, clicking .my-button simply logs our model attributes.View#initialize()is run right when the object is created. Inside it, we listen for changes on the model which invoke render. Render passes in our model to the javaScript template which attaches its HTML to #dog-bone (this.$el).View#templateis a reference to an Underscore JS template to which we can add JS variables.We can now update our UI simply changing some attributes on our cat1 model:
cat1.set({color: "purple"});Underscore templates
You can actually use other javaScript templating frameworks, Backbone requires Underscore as a dependency so we use it here. Pretty much it just contains the html you want and the model attributes as javaScript variables.
  <script type="text/template" id="my-template">
   <h1> This dog / cat hybrid thing is <%= color => color.</h1>
   <h2> It is age <%= age %> </h1>
   <h3> Also, it's name is <%= name %> </h3>
  </script>
Underscore templates accept hash objects which is why our model works so well here. But you can also create you’re own hash object and pass it too it,
  var objectForMyTemplate = {
   "name": "Xena",
   "color": "grey",
   "age": 3
  };
It’s all just javaScript
I often find that I need to use a Backbone View or Model I created elsewhere in my code but I need to change a few of the methods without changing the original code.
This is where JavaScript prototypical inheritance comes in really handy, as do the JS call() and apply() functions.
In Backbone, when you create a new view or model with extend, you’re defining the prototype for the new object.
This is the JavaScript way of “inheriting” properties that will go into your object and makes it easy to extend your own models and views.
  var oldInitialize = Dog.prototype.initialize;

  Dog.prototype.initialize = function () {
    console.log("Woof woof");
    oldInitialize.call(this);
  };

  new Dog({model: cat1});
Our new Dog instances will now log ‘Woof woof’ as well as do everything it does in the original View code.
There is more to working with Backbone including Routers, Collections, helpful Underscore functions, organizing Backbone with require.js, testing with Qunit or Jasmine. For that and much I recommend Developing Backbone.js Application.

Recent Posts
- Jenkinsfile with Slack notifications
- Mount Shasta in a day
- Decorators and React Components
- Let's talk about webpack
- How to keep React tests maintainable
- How to write good javaScript fast
- Debugging npm issues in webpack
- Polling an AJAX request in React + Redux
- Testing axios with axios-mock-adapter
- Objects and Arrays in ES6
- Building a simple app with React and Redux
- Testing javaScript with jsdom and Django in jenkins
- React.js, performance and web security at Fluent 2015
- Mixing Backbone Events
- Leveling up with backbone.js
- How I use git