Testing javaScript with jsdom and Django in jenkins
Jsdom is an implementation of the DOM in javaScript. Here is how to set it up using python and Django for generating html fixtures, mocha for javaScript testing and sinonjs for stubs and mocks.
Install the packages from npm.
npm install --save mocha jsdom sinonSetting up jsdom
I created a file called browser.js that sets up jsdom and stubs out a few functions that are global in a real browser. This includes some ‘taming’ of sinons server mock which did not work for me right out of the box.
  global.jsdom = require('jsdom');

  global.document = jsdom.jsdom(
    '<!DOCTYPE html data-debug=1>' +
      '<head></head>' +
      '<body>' +
      '<div id="mocha-fixture"></div>' +
      '</body>' +
    '</html>'
  );

  global.document.activeElement = document.body
  global.window = document.defaultView;
  global.XMLHttpRequest = global.window.XMLHttpRequest;
  global.navigator = window.navigator;

  global.sinon = require('sinon');
  global.sinon.useFakeXMLHttpRequest();
  global.window.XMLHttpRequest = global.XMLHttpRequest;
Running the tests
You can run single test suites this way by just requiring this file when you run the mocha command, for example;
mocha static/test/build/testUpdateBillingInfo.js --require 'static/test/mocha/browser.js'You can create another file to run all of the tests at once. This file will just import all of your mocha test modules. For example, I created a file called run.js. At the top of this file I imported the browser.js file which any mocha module is dependent on in this setup. Then I simply run the file in mocha.
mocha static/test/mocha/run.jsGenerating html fixtures
Some of my javaScript uses html on the page, for example validating fields in a form. For me, these were in Django templates. I decided I would dynamically generate these templates using a Django management command. I could run this command before I run the mocha tests in jenkins. This way the tests will fail if anyone modifies the templates in such a way as to break the javaScript.
  import os

  from django.conf import settings
  from django.template.loader import render_to_string

  from django.http import HttpRequest

  from django.utils.encoding import smart_str, smart_unicode
  from django.template import RequestContext
  from django.test import RequestFactory

  class MochaTestCase(object):
      def build_fixture_html(self, file_name, content):
          file_path = 'static/test/mocha/fixture/%s' % (file_name)
          directory = 'static/test/mocha/fixture'

          if not os.path.exists(directory):
              os.makedirs(directory)

          if not os.path.isfile(file_path):
              open(file_path, 'w')

          with open(file_path, 'w') as file:
              file.write(smart_str(content))

      def to_string(self, template, context):
          request_factory = RequestFactory()
          request = request_factory.get('/')
          return render_to_string(template, context, RequestContext(request))

      def get_content(self):
          return self.content

      def render(self):
          self.build_fixture_html(self.__class__.fixture, self.get_content())
This is my base python class for creating a blank file, outputting a Django template into a string and then writing it into this blank file.
I pass my Django template to this base class to write these files.
  from forms import FeedbackForm

  class FeedbackFormTestCase(MochaTestCase):
      fixture = 'feedback_form.html'

      def __init__(self):
          self.content = self.to_string('includes/feedback_form.html', {
              'feedback_form': FeedbackForm()
          })
Another function in this same python file creates the class and actually calls the function to write the file.
  def buildFixtures():
      feedbackForm = FeedbackFormTestCase()
      feedbackForm.render()
Running a Django management command
In order to generate these fixtures everytime I need them, I need to run a Django management command.
  from django.core.management.base import BaseCommand
  from tests.mocha.js_fixtures import buildFixtures

  class Command(BaseCommand):
      help = 'Generate fixtures from Django for mocha javaScript tests.'

      def handle(self, *args, **options):
          buildFixtures()
I called this file generate_mocha_fixtures.py. Now I can build all my mocha fixtures by running this Django management command, ./manage.py generate_mocha_fixtures.
Including fixtures in tests
Now that Django can generate my test fixture files, I can simply include these files in my tests using a javaScript template engine like lodash. For example, the setup and teardown of my mocha tests may include the following.
  import feedbackFormTpl from './fixture/feedback_form.html';

  describe('Test feedback form', function () {
    beforeEach(() => {
      $('#mocha-fixture').html(feedbackFormTpl());
    });

    afterEach(() => {
      $('#mocha-fixture').html('');
    });
Debugging
You can include a debug option when running mocha and the tests will stop at every point in your javaScript where you include debugger; statements. Simply run;
mocha debug static/test/mocha/run.jsDebugging in node is a bit different then in the browser. Maybe you have written a bit of python before and are familiar with pdb. It is a little bit like that.
There is some great documentation on the matter here.
To get started, run the debugger command with some debugger; breakpoints in your code. Type cont to go to the next breakpoint or type repl, then type some variables, their values should be directly outputted back to you.
Using scripts
I like to add my mocha commands as scripts so that they are easy to remember. In my package.json file they look like this,
  "scripts": {
    "test": "mocha static/test/mocha/run.js --timeout 5000",
    "test:debug": "mocha debug static/test/mocha/run.js",
  },
Now I can simply run npm run test to run all of my mocha tests. The timeout option just raises the limit of time a test has to finish before mocha shuts it down and fails with a ‘timeout error’.
Adding to jenkins
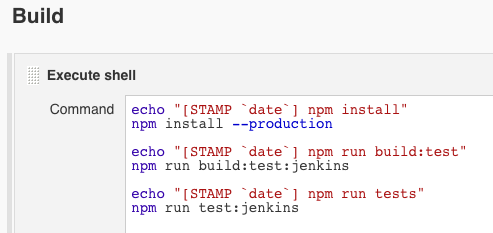
In jenkins, add a new build and call it something like “mocha-tests”. Within the build section, add a build step to execute shell. Here you should add the script commands jenkins will need to run the tests.

The first command will install all the node_modules in package.json using the --production flag to indicate that scripts listed under devDependencies in package.json should not be installed. I’ve added two new script command to my package.json.
  "scripts": {
    "build:test:jenkins": "./manage.py generate_mocha_fixtures --settings=settings.mocha && webpack --config webpack.config.test.js --progress --colors",
    "test:jenkins": "mocha --recursive -R xunit static/test/mocha/run.js > test-reports.xml --timeout 30000"
  },
Running npm run build:test:jenkins will run my Django management command and generate my html fixtures from Django templates. Following that, I will compile my test files from webpack (this may be an unnecessary step for you).
Running npm run test:jenkins will write the mocha test results to a test-reports.xml file in jenkins. Jenkins will use this to properly inform you of failed tests.
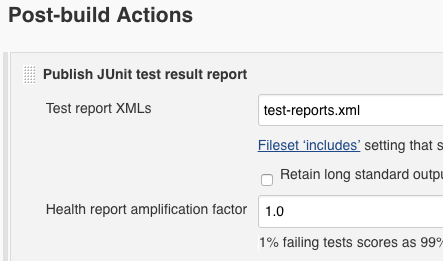
Below the build section is a Post-build Actions. I add an action to publish a JUnit test result report. In the test report XMLs, add test-reports.xml.

Finishing up
So is it worth using jsdom for javaScript testing? Among the pros are that it is quite fast. It is easy to run hundreds of tests very often. Also, debugging in node is a nice change of pace from working in the browser.
However, it is worth remembering that jsdom is not a real browser. If your tests rely too much on the DOM, you may be opening yourself up to bugs you can’t catch. For me, this is a good challenge to do much less DOM manipulation.


