


Let's talk about webpack
Confused by webpack? You’re not alone. I often field a lot of webpack questions at work so I put together something of a short guide here.
Webpack Basics
Webpack is a module bundler for javaScript. It can handle things like code splitting, hot reloading, ES6 to ES5 transpilation and much more. Webpack has a bit of a learning curve and can be difficult to setup at first so let’s start with some basics.
Entry
Entry points are the javaScript files that webpack will bundle for you. The syntax is;
  const config = {
    entry: {
      main: './path/to/my/entry/file.js'
    }
  };
This configuration will turn out a javaScript file named main.js that is bundled by webpack from the file that is at ./path/to/my/entry/file.js.
Output
You need to tell webpack where to bundle your files. The output setting lets you set the directory that webpack should output the bundled files and also how they should be named. A simple example is;
  const path = require('path');

  module.exports = {
    entry: {
      main: './path/to/my/entry/file.js'
    },
    output: {
      path: path.resolve(__dirname, 'dist'),
      filename: '[name].bundle.js'
    }
  };
In this example, the bundled file will show up in the folder named dist in your project with the filename main.bundle.js.
See additional configuration for the output setting here.
Loaders
Webpack only understands javaScript. Loaders help webpack transform files that it does not understand so they can be added to your bundles, this includes CSS, html, SASS files, JSON etc.
  const path = require('path');

  module.exports = {
    entry: {
      main: './path/to/my/entry/file.js'
    },
    output: {
      path: path.resolve(__dirname, 'dist'),
      filename: '[name].bundle.js'
    },
    module: {
      rules: [
        {
          test: /\.jsx?$/,
          use: [
            {
              loader: 'babel-loader'
            }
          ]
        }
      ]
    }
  };
In this example we have added the module setting. A loader is added to the rules array. This loader called babel-loader looks for files with the extension .jsx. Babel loader transforms javaScript written in the ES6 syntax to ES5.
See additional configuration options for loaders here.
Plugins
Webpack can be customized with plugins. There are many webpack plugins available on npm.
  const path = require('path');

  module.exports = {
    entry: {
      main: './path/to/my/entry/file.js'
    },
    output: {
      path: path.resolve(__dirname, 'dist'),
      filename: '[name].bundle.js'
    },
    module: {
      rules: [
        {
          test: /\.jsx?$/,
          use: [
            {
              loader: 'babel-loader'
            }
          ]
        }
      ]
    },
    plugins: [
      new BundleAnalyzerPlugin({
        analyzerMode: 'static',
        reportFilename: 'bundle_analysis.html',
        openAnalyzer: false,
        generateStatsFile: true,
        statsFilename: 'stats.json'
      })
    ]
  };
In the above example there is a new setting plugins added. The array includes a plugin called BundleAnalyzerPlugin available on npm. Plugins require instantiation through the usage of new and often allow an options object to be passed into them.
Handling CSS with PostCSS
PostCSS is a webpack loader that has many plugins to allow you to do a wide array of things with CSS that include inline images, linting, transpile future CSS syntax, support variables and mixins, CSS modules and more.
Setup
A great way to setup PostCSS is to use the ExtractTextPlugin to pull out the CSS from the javaScript bundles into a separate file. This will allow a few advantages such as you can cache your CSS separately from your javaScript, improve the compilation time of javaScript and CSS separately, improve runtime since CSS is requested in parallel with the javaScript bundles.
You can add ExtractTextPlugin as a loader.
  const postCssPlugins = [
    require('postcss-import'),
    require('postcss-url'),
    require('postcss-filter-gradient'),
    require('postcss-cssnext'),
    require('postcss-extend')
  ];

  ...

  module: {
    rules: [
      {
        test: /\.css$/,
        use: ExtractTextPlugin.extract({
          fallback: 'style-loader',
          use: [
            {
              loader: 'css-loader',
              options: {
                modules: true
              }
            },
            {
              loader: 'postcss-loader',
              options: {
                plugins: () => postCssPlugins
              }
            }
          ]
        })
      }
    ]
  }
A few things are going on here. First, this looks for files that include the extension .css and uses the ExtractTextPlugin loader on them. Secondly, the plugin takes an options object. options.use specify the loaders required for converting the resource to a CSS exporting module. This example uses css-loader which allows for CSS modules and importing CSS files into your javaScript modules. post-css can be used standalone but is recommended to be used in conjunction with css-loader. With postcss-loader we can include a plethora of PostCSS plugins, as seen in the above example with the postCssPlugins array.
CSS Modules
Look for the modules options flag in css-loader to enable CSS modules. CSS modules allow you to import CSS files from your JS modules. CSS files imported into javaScript modules will show up as javaScript objects. Example.
  .card {
    position: relative;
    display: inline-flex;
    vertical-align: top;
    width: 100%;
    background: #FFF;
  }

  .border {
    border: 1px solid red;
    display: inline-flex;
    flex-direction: column;
    justify-content: flex-start;
    width: 100%;
  }
Pretend the above is in a file called card.css. You can import this file into your javaScript module.
import styles from './card.css';styles will contain a key value object of the CSS file. You can add these styles to your React components like so;
  import styles from './card.css';

  export default class Card extends Component {
     render() {
        return (
          <div className={style.border}>
            <form className={style.card}>
            </form>
          </div>
        );
      }
    }
These CSS styles will be compiled with hash values so instead of seeing something like <div class="border"> in the html. You will see something like <div class="_23_aKvs-b8bW2Vg3fwHozO-border">. Though the way these hash values appear can be customized, the purpose is that these styles are local to the component so there are never any CSS styles that override them. This allows you to keep your CSS very clean and avoid the many pitfalls of deeply nested CSS.
You can still write global CSS in these files, the syntax is;
  :global(.card) {
    position: relative;
    display: inline-flex;
    vertical-align: top;
    width: 100%;
    background: #FFF;
  }
How to handle assets like images and font files
At some point you may want to include images, svg, JSON and maybe even font files in your project. There are a few loaders that can handle this, file-loader for images and fonts and raw-loader can handle svg and text files, json-loader can handle JSON.
  module: {
    rules: [
      {
        test: /\.(jpg|png|ttf|otf)$/,
        loader: 'file-loader'
      },
      {
        test: /\.json$/,
        use: 'json-loader'
      },
      {
        test: /\.svg$/,
        loader: 'raw-loader'
      }
    ]
  },
In this example, we add the three new loaders to look for our images, font files, svg and JSON files.
Dealing with external libraries
Sometimes you may want to exclude certain packages from the webpack bundle but still include them as dependencies in your modules. This may be because the package doesn’t play well with webpack, throws errors you can’t resolve when bundling or maybe you just want to retrieve it from a CDN.
You can use the externals setting for this. These packages will be retrieved at runtime.
  externals: {
    lodash: 'lodash'
  }
In this example, require('lodash') is external and available on the global variable lodash. You will want to include a script tag in your HTML to these libraries. Example that pulls lodash from a CDN.
<script src="https://cdnjs.cloudflare.com/ajax/libs/lodash.js/4.17.4/lodash.min.js"></script>Improve bundling performance
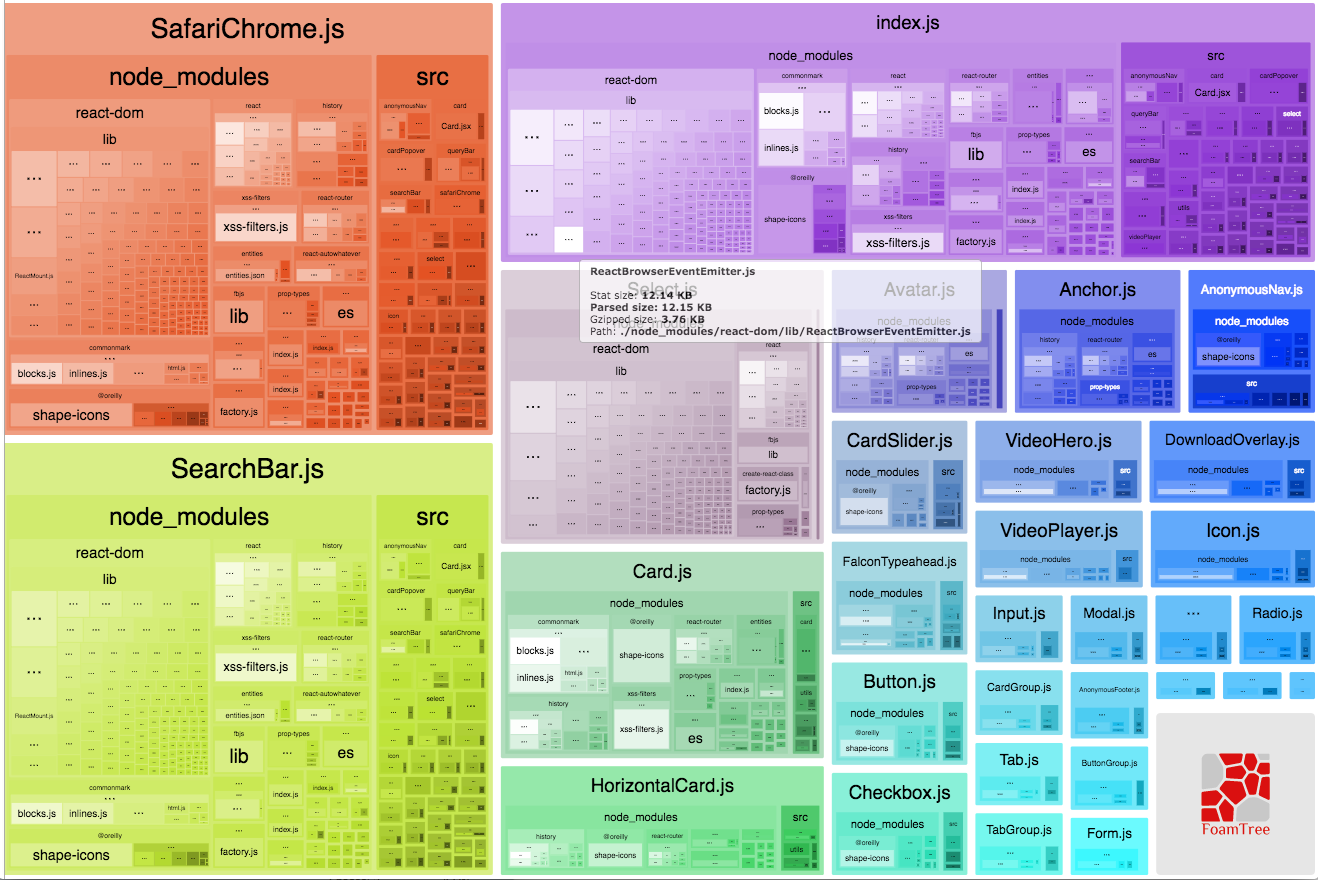
Webpack is pretty opaque so it can be difficult to figure out why your bundles are way too big or it takes forever to bundle them. webpack-bundle-analyzer steps in to fill this void. This webpack plugin can make it very clear what modules are taking up the most size, what is really inside each module etc. The following is an example configuration of this plugin.
  const BundleAnalyzerPlugin = require('webpack-bundle-analyzer').BundleAnalyzerPlugin;

  ...

  plugins: [
    new BundleAnalyzerPlugin({
      analyzerMode: 'static',
      reportFilename: 'bundle_analysis.html',
      openAnalyzer: false,
      generateStatsFile: true,
      statsFilename: 'stats.json'
    })
  ]
Using this configuration you can run the command webpack --profile --json > stats.json. This will generate a stats.json file in your projects root folder. Opening this file at the bottom will be printed a direct link to the file bundle_analysis.html. Opening this link in a web browser will show you graphs of the analyzed modules.
There are more options which include running a server, check out the package here.
Bundle common dependencies
A nice way to improve performance is by bundling all dependencies (or code which doesn’t change often) which are common to your whole project (such as React, Redux etc.) into a specific file that you can then cache. The webpack-vendor-chunk-plugin is great for this.
  plugins: [
    new webpack.optimize.CommonsChunkPlugin('vendor', 'vendor.js'),
  ]
The above example setting will bundle common libraries into a file called vendor.js. If you find that after analyzing your bundles this file is very heavy, you can take this example further and exclude specific packages.
  const EXCLUDED_FROM_VENDOR = [
    'language-tags',
    'language-subtag-registry',
    'd3',
    'moment',
    'moment-timezone'
  ]

  ...

  new webpack.optimize.CommonsChunkPlugin({
    name: 'vendor',
    minChunks(module) {
        return module.context
          && module.context.indexOf('node_modules') !== -1
          && !(new RegExp(EXCLUDED_FROM_VENDOR.join("|")).test(module.context));
    }
  });
The above example includes an option in the CommonsChunkPlugin that tells it to bundle all files from node_modules except the packages that are listed in the EXCLUDED_FROM_VENDOR array.